Setting Up Visio for Process Navigator
NOTE: This article only applies if you are not using the Macro Free File format (.vstx).
When using a Macro enabled Template and stencil you need to set up Visio for use with Process Navigator, the following steps must be taken:- Enable macros
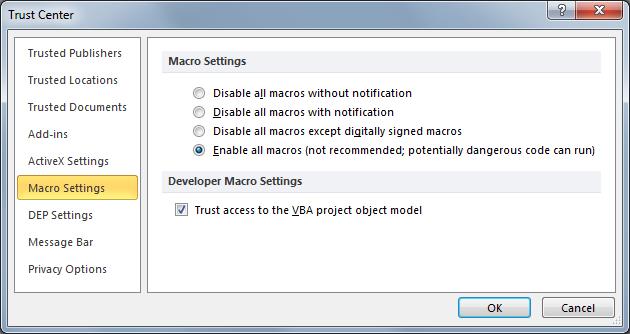
By default, macros are disabled in Visio. Macro security in Visio 2010 and Visio 2013 is set to Disable all macros with notification. To be able to run macros, Process Navigator requires macro security to be set to Enable all macros. - Enable VBA access
Process Navigator automates Visio, and may automatically update the VBA code in a Process Navigator map file (a Visio VDX file). Process Navigator also requires access to the Visual Basic project. Although Process Navigator will prompt you to enable this setting, we recommend it is set when configuring Visio before the first use of Process Navigator. - Choose the default file type
Process Navigator requires files in the VSDM file format from Visio 2013/2016 and in the VDX format from Visio 2010. - Set the default stencil and template location
You will also need to set the default location for your stencil, template and properties files in Process Navigator. You can do this either from Process Navigator or directly in Visio (see Options > File Locations).
NOTE: These configurations are user-specific, so need to be made while logged on as the Process Navigator user. On a Triaster Server, which runs automated publications, these configurations need to be made for the publication user, i.e. the user account designated to run Triaster services.
Enabling Macros and VBA Access
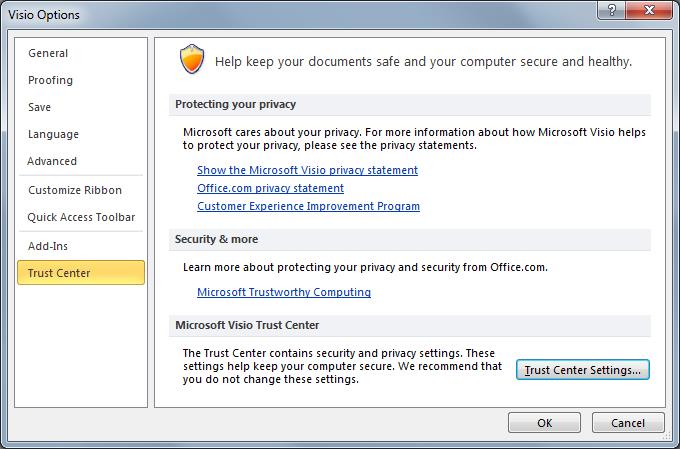
- Go to File > Options.
- Select Trust Center.
- Click Trust Center Settings.
- In Macro Settings, select Enable all macros.
- On the Trust Center dialog, under Developer Macro Settings, ensure Trust access to the VBA project object model is selected.
- Click OK to close the Trust Center dialog.
- Click OK to close the Visio Options dialog.


Setting the Visio File Format
The following sections explain how to set the file format in Visio 2013 and Visio 2010.
Visio 2013/2016
By default, Visio 2013/2016 saves files in the Visio Document (VSDX) file format. If you are using a stencil and template not designed to be macro free, Process Navigator requires files to be in the Visio Macro-Enabled Document (VSDM) file format.
To change the format:
- Click on the File tab.
- Click Options.
- In the Visio Options dialog, click Save.
- Under Save documents, set Save files in this format to Visio Macro-Enabled Document (VSDM).
- Click OK to confirm the setting and close the dialog.
Visio 2010
Process Navigator requires all files to be saved in VDX format (Visio XML Drawing). However, by default, Visio saves files in VSD format (Visio Drawing).
To change the file format to Visio XML Drawing (VDX):
- Click on the File tab.
- Click Options.
- In the Visio Options dialog, click Save.
- Under Save documents, set Save files in this format to Visio XML Document.
- Click OK to confirm the setting and close the dialog.
Setting the Default Visio Stencil and Template Locations
Access to your customised properties and template file is available within Process Navigator (see Options > File Locations).
If you are saving your customised template file on a server, you will need to ensure that both the template (.vtx) and the stencil (.vss) are stored together. In addition, you will need to ensure that Visio is set to look at the alternative location.
Visio is configured to search particular locations for files such as templates and stencils. The configuration is user-specific, so, for example, stencils stored outside Visio's usual search paths may not be available to some users.
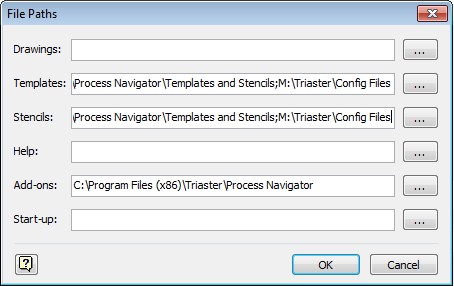
Visio should be configured to search where the Process Navigator stencils are stored. Note that different paths are separated by semi-colons.
Setting the default stencil location in Visio is also a good idea, as if at any stage a stencil is missing from a process map when you open it, you can re-attach the stencil from the Shapes menu.
In Visio (2010 or 2013):
- Select File > Options > Advanced and then click on the File Locations button at the end of the General section.
- Select the Stencils location and browse to where your customised stencil is stored.
- Select the Templates location and browse to where your customised template is stored.
- Click OK.

Default File Locations
If you are working remotely, you may wish to save your customised properties, template and stencil files in the default locations.
- Properties File (.xml)
C:\Program Files\Triaster\Process Navigator - Template File (.vtx)
C:\Program Files\Triaster\Process Navigator\Templates And Stencils - Stencil File (.vss)
C:\Program Files\Triaster\Process Navigator\Templates And Stencils
NOTE: Please ensure that you always rename your customised properties file and template file. If you keep the names the same as the default files (e.g. Properties.xml), they will be overwritten upon any upgrade of the software.